One of the most aggravating areas of pool maintenance has to be water pressure issues. Whether these invisible gremlins rear their head in symptoms like your pump is not pushing water like it used, can’t/loses prime, or air bubbles, it can be a real struggle finding the source. Lucky for you, there are a couple of really easy tricks to finding the source of a suction side air leak.
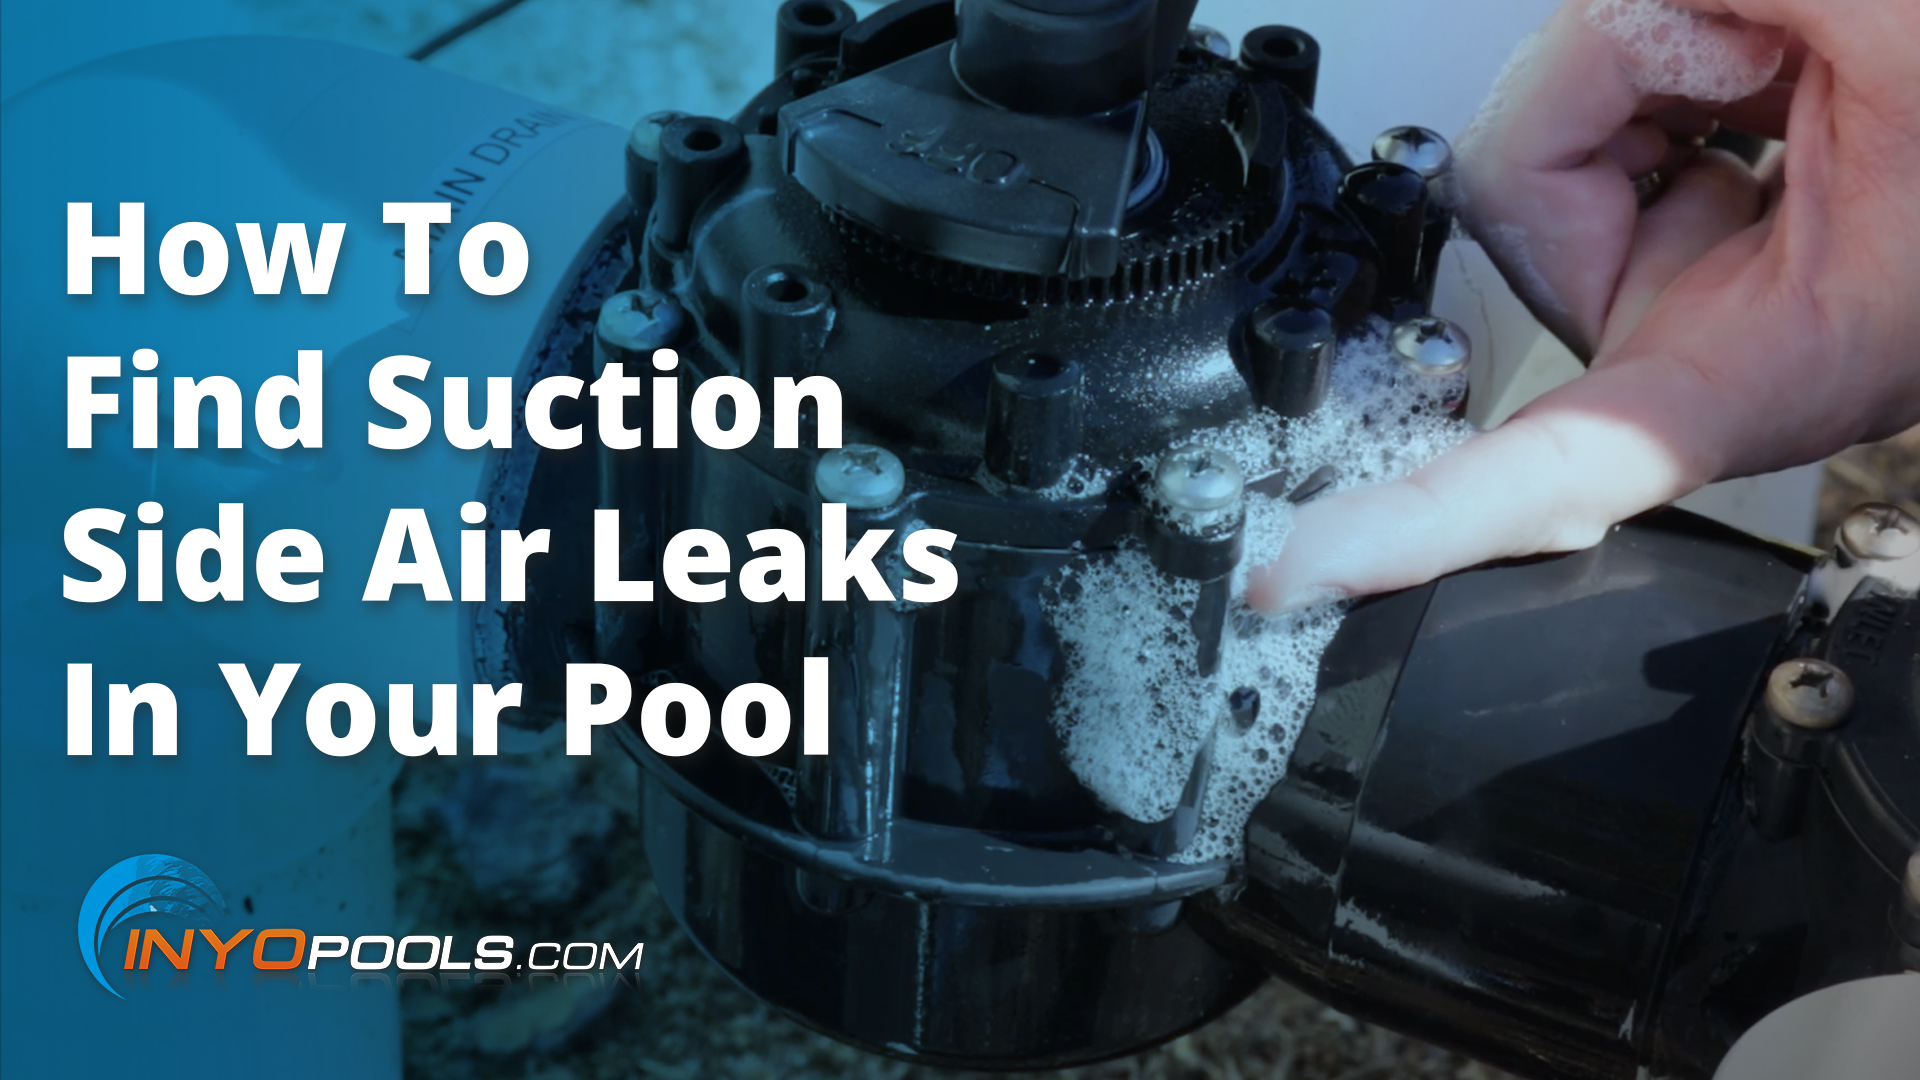
There are three popular, and more importantly simple ways for locating a sucking air leak, one using smoke, the soapy water, and lastly, shaving cream.
We suggest using the smoke method, aka The Smoke Trick, and for this step, you’ll need a lighter and some incense. With the pump running, light your incense, and slowly scan the stick over any PVC joints, valve ports, and covers, and pump housing. If the smoke gets drawn in, that will pinpoint the source of one of your leaks.
Smoke Method Steps:
- Turn on the pump
- Light an incense stick, cigar or any smoke creating means. Make sure the smoke is thick enough so it is visible. Also, do not attempt on windy days.
- Hold the smoking end of the stick directly under or next two (within an inch or two) all the various seams of your suction side plumbing. If an air leak is present, you should see an obvious pulling of the smoke column.
- Mark any problems areas showing signs of an air leak, address as needed.
The other hack is the Shaving Cream Method; If you are averse to smoke, or have some extra Barbasol on hand, this trick is quick and cheap. Though messier than the Smoke Trick, the pockmarked shaving cream give you clear visual ID for the location of air leaks.
Shaving Cream Method Steps:
- While the pump is off, lather the joints, seams, and any other parts of the suction-side plumbing with an evenly applied layer of shaving cream
- Turn on the pump.
- Inspect the shaving cream covered dimpling. These dimples are signs the cream is being pulled in by an air leak.
- Mark any areas that show dimpling, then clean off the shaving cream.
- The shaving cream gives a clear visual identification of the air leak locale.
**If your pump is unable to prime when attempting either of these methods make sure to only let the pump run dry for 1 to 2 minutes. Anything longer could cause damage to the pump’s internals**
Using a standard foam shaving cream, lather your pipe joints with a healthy cost of foam, then turn on your pump. If the foam begins to bubble or have this concaved shape, then you have found an air leak.
The easiest to prep is the soapy water method; all you need is a cup of water and dish soap.
Soapy Water Method Steps:
- Pour a dime size or a little larger dollop of dish soap into a cup.
- Fill cup three-quarters of the way full
- Agitate water to create foamy bubble.
- With the pump running, scoop out foam from the cup and hold it to any suspect plumbing seams. If an air leak is present, the foam will be drawn into the problem spot
What is a Suction-Side Air Leak?
Your plumbing system can be broken down into two distinct parts: suction-side and the pressure-side. The suction-side is your plumbing and equipment starting at your pool, like the main drain and your skimmer, the PVC, valves all the way up to the front of your impeller. The beginning of the pressure side of your pump is when the water enters the impeller. This is because, before the impeller, the water is being pulled from the impeller, the impeller than turns that pulling force into a push at it spins and shoots the water out the pump and through the rest of your pool equipment.
Why a Suction Side Air Leak is bad?
An air leak is bad for your plumbing system because a pool pump needs to purge the air from the pipe before to draw water from the basin, this process is called priming. As a priming pump is working to purge the air, an active air leak working against the pump, replacing the air, and severely reducing the pump’sg capacity.
For a simplified explanation, imagine you are drinking through a straw, then imagine someone pokes a hole in that straw. What happens? Air enters the straws, leaving you parched and annoyed.
Symptoms of an Air Leak
- Unable to prime – If your pump is suddenly unable to prime, I suggest checking a few other things. It could be as simple as a closed valve, or a blocked impeller.
- Losing prime – If the pump runs dry after manually priming the pump with a hose, , it could be a sign of a more severe air leak. Depending on the location of the leak, the problem could be intermittent, only affecting your pump when a diverter valve is turned to a certain setting.
- Air bubbles – Likely the most common sign of air in your lines, this is not always a harbinger of doom. If your return lines only bubble shortly after a priming cycle, then it is just the natural progression of the pump purging air. If the bubbling continues through the runtime of the pump, then there may be an issue that needs further diving into.
- Low water pressure – This point is simple. The more air in your lines, the less room there is for water. Check your filter’s pressure gauge and if the PSI rating is lower than your normal “clean” reading, use the filter’s air relief to release air pressure.
If you have any useful method for finding a suction side air leak, please leave a comment down below.







Hi Tony,
Did you ever get this issue resolved? Im having the same problem. Thanks
What about a lid that keeps popping off when I turn off the pump. Could this be caused by this? Will lube in the o ring be enough?
How is the lid o-ring popping off if the lid is on securely? Is this an old or new gasket? If it is old, I’d try replacing it. If it is new, you need to confirm that you bought the right one and that it is not installed incorrectly.
Good blog, thank you for the helpful info. I am a newbie owner of a 1 year old pool, and just SO frustrated, as I seem to be having issues both before and after the pump.. So at the pump, the water in the pump is always about 1 inch below the pump lid, whereas before, there was water all the way up to the lid, with only one small bubble. Does this 1 inch of air cause issues in the system, and what might its cause be? Also, the pop up cleaning heads no longer pop up 100%, and the water coming out of them has gone from a spray to a mere trickle, and returns at the skimmer returns are also weak… The psi on the filter gauge is about 7-8 psi higher than normal, despite the filter having been cleaned 3 weeks ago and backwashed just days ago. There’s also a bit of green algae on the pool steps (which I believe is due to the poor water movement). So it’s like there’s some problem with the water returning to the pool, but for the life of me I can’t figure it out, and the maintenance guy is also clueless. Any ideas would be very appreciated.
Gia, Did you figure out your pool issues? I have the very same conditions you described. Thank You
Danny
I just purchased a house with a pool. It has constant bubbles from the return and the pump doesn’t print fully. When I connect the vacuum the prime goes even further down. I have tried the bubble method and nothing stand out.
I suggest using the steps in this guide to troubleshoot your system, How to Identify and Correct Air Leaks or How To Determine Why a Pool Pump Won’t Prime.
The air bubbles could be quite a few things, so that I would use that guide first. But if you lose prime when adding the vacuum hose, it is either because the additional hose is too much for an already air-filled system to overcome or there are air leaks in the hose. Before connecting the vacuum hose, submerge it underwater to purge any air. Focus on the air leaks causing the bubbles in the return line first, then the vacuum hose.
Air relief negative pressure when pump is on?
When the VS pump is running at 600 RPM, the relief is sucking air. Also, when I turn the pump off, most of the water quickly gets sucked out of the strainer basket. The above symptoms started during a current cold snap but I have had typical signs of a suction side leak (air coming through returns; pump losing prime after off for a few hours, etc) after I put everything back together after an emergency winterization during a rolling blackout from the 2021 severe winter storm (OK). I have checked all the usual offenders but it persists (re-lubed plugs and o-ring on pump; did soap test). Just making sure these are symptoms of a suction side leak before I do more investigation. I’m thinking about pushing water through the skimmer with a hose to find the leak if shaving cream doesn’t work.
Even though I replaced the o rings and lubed the suction diverter valve I still had an air leak. Problem solved by replacing the valve stem and cover on suction valve. Hope this helps.
Thanks for the extra tip.
Just curious if you ever found out what the problem was with your pool? My friend has the exact same problem and sounds like the same plumbing setup.
We have a suction side leak — bubbles in the filter basket before the impeller, air accumulates in the cartridge filter housing and air bubbles come out of the return. We replaced and lubricated the main o-rings, and used your shaving cream method with no apparent leaks. We also tried putting soap bubbles on all the joints. The weir has been replaced and the water level stays up, so no water leaks. The pressure gauge has been checked. The filter is running at only 4 psi max, and when Polaris is running it’s only 2 psi. We have a Dura-glas self-priming 3/4 hp pump, and a Hayward Star-clear II cartridge filter. No heater or chlorinator. No main drain and just one pipe runs from the skimmer to the pump. The cartridge filter is slightly out of plumb (but don’t know how that could cause this problem). Our pool tech has not been able to solve the problem…can you?
This is a tough one. It sounds like you have been thorough in investigating this problem.
The only thing that sticks out to me was your mentioning of the Sta-Rite Dura-Glas. It is listed as key 26 on the parts aforelinked parts diagram. You said you changed the main gaskets; I’ll presume you are referring to the lid, housing, and possibly even the shaft seal. But one gasket that could be overlooked is the square flange gasket that seals the seam between the strainer and main pump housing.
Again, it sounds like you have been on top of this problem, so it is hard to think about anything you could be missing. Have checked that the weir is working correctly?Make sure it is allowing an even flow flow of water into the system and not making any gulping noises?
I continue to have pressures above 20 psi after cleaning de filter and reassembling filter first cycle is good starts off at 12 psi then after I backwash properly the pressure jumps way up 19 20 psi…. I have a Hayward de 3600 with brand new grates and manifold have replaced manifold o ring spider gasket and diverter o ring have no water leaks. All functions work on vari flo valve . Have great flo on backwash and recirculate but filter settings jump so high so fast??? I have cleaned air breather time and time again only has good pressures after taking filter apart and cleaning and putting back together!! Have been with this pool over 20 years never had this issue?? Can you help?
You may need to perform a rinse cycle immediately after backwashing a few times… just happened to me. The De may have become hard/dirty
How much DE are you putting in to recharge the grids?