Part # B841
Warranty 1 Year
Manufacturer Code B2841V1
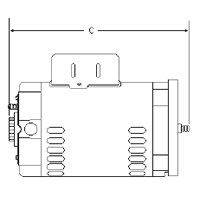
Dimensions 14" L x 6.5" W x 6.5" D
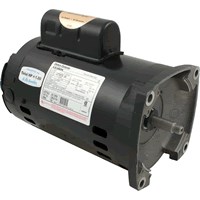
Century Centurion (Magnetek) replacement motors for Pentair WhisperFlo, energy efficient, full rated pumps. Specifications: HP = 1, RPM = 3450, Voltage = 115/208-230, Amps = 14.8/7.8-7.4, Service Factor = 1.65, Frame = 56Y, Shaft = Threaded.
Note: NOT California or New York Title 20 Compliant.
California and New York Title 20 Compliant Option:


What is Service Factor?
Reply
Service Factor(SF) is a multiplier that when multiplied by the horsepower of the motor indicates the total permissible horsepower loading that may be carried when the motor is operating at rated voltage and frequency. The most important thing to remember when replacing a motor is that the replacement motor's horsepower times its service factor must be equal to or greater than the original motor's horsepower times its service factor. The Service Factor rating can be found on the motor label. See Step 4 of our How to Read a Pool Motor Label guide.
Reply
Why do I need to purchase a new shaft seal?
Reply
We strongly recommend replacing the shaft seal. The purpose of a shaft seal is to prevent water from running down the shaft of the motor and into the motor housing. Water will damage the bearings and cause the motor to fail. A new shaft seal should be installed whenever a motor is replaced. The motor manufacturer can deny the warranty if the motor fails to due to water damage from a faulty shaft seal. To find your shaft seal you will need to visit our Pool Pump Parts Page or the Spa Pump Parts Page and select your make and model.
Reply
Why should I purchase a Tune Up Kit?
Reply
A Tune Up Kit includes all of the essential replacement seals and gaskets for the pump. The seals and gaskets should be replaced when installing a new motor on your pump. New seals will prevent the pump from leaking water or losing the prime. A Tune Up Kit will protect your motor and ensure that the pump is working efficiently.
Reply
I'm trying to replace the motor on my pool pump but all these numbers and abbreviations on the motor label are really confusing me. What do they mean?
Reply
Replacing a pool pump motor is not as difficult as it seems. You can try looking here. If you need help figuring out what the information on your label means. If you are still having difficulty figuring it out you can call us at our toll free number or you can send us a photo of your motor label here.
Reply
I just finished replacing the shaft seal on my booster pump. As soon as I turned the pump on water was leaking from the shaft seal. Is it defective or am I doing something wrong?
Reply
Depending on the model, the installation of a booster pump shaft seal can be slightly different than a pool pump shaft seal. Some booster pump and pool pump shaft seals require that a silicone sealant be used on the outer areas of the metal seat of the shaft seal. The seal will need to be lightly hammered into the body of the pump. You can use a 1 inch PVC coupling or a piece of 1 1/4 inch PVC pipe and a rubber mallet. This procedure will apply to any pool pump or booster pump using a >PS-1000 style shaft seal.
Reply
Less than 1 hr
Screwdriver, Socket Set, Adjustable Wrench
I was discouraged after being told our pump was not working while trying to open the pool for the season. I was told a replacement would be $700.00 plus. I search the internet and found it here at INYOPools for less than $400. I watched a few videos on pump replacement and decided to take it on. I made sure the electric was off and no longer hot from the panel. There were two sets of bolts, one for the pump to the impeller housing and one set for the housing to the filter housing. I used a 9/16th inch socket to remove the bolts holding the housing to the filter housing. Once this was removed, it was easier to remove the bolts holding the pump to the impeller housing, with the same 9/16th inch socket. Once both were free and separated, I used a straight screwdriver to remove the screw holding the impeller on the motor, while holding the bolt on the back of the motor still with an adjustable wrench. Once this was apart, I had access to the pump seals, which were easily pulled off. I was able to replace the lower seal with the new part, but the upper seal was still in great shape and I left it on. Once I was ready to reassemble, the steps were very easy in reverse. The only addition was using a vasoline around the edges of the gaskets that were around the impeller as well as around the housing that connected to the filter housing. This just allowed a better seal in hopes that I would not have to replace the gasket. I had a 240V connection, so both black wires were connected and then the ground. I also had a bonding wire that connected to the back of the motor as well. Once these connections were made, I cleaned up everything around the motor and turned the power back on. I was excited to hear the motor come on and then after priming the pump to see all of the outlets start moving water. It took about 1 hour and was super easy to do.
1 to 2 hrs
Screwdriver, Electrical multimeter
Long story short, the house we bought had a noisy bearing. I mean LOUD. Our neighbors complained. Overwinter, it seized. Upon recognizing the equipment failure, I ordered these parts intending to replace the bearing and seals, but instead procrastinated and lost these when the time came. Ordering more, will review when complete 👍🏻
1 to 2 hrs
Screwdriver, Nut Drivers, Socket Set, Wrench Set, Impact wrench, strap wrench
1 0
I first turned off all power to the pool equipment. Then I disassembled the challenger pump and the electrical connections to the motor. This allowed me to take the motor with pump backing plate and impeller to my workbench for further disassembly.
Don’t forget the screw holding the impeller to the motor shaft is turned clockwise to loosen. A strap wrench makes impeller removal easy turning it counterclockwise to remove from the motor shaft. The hardest part was loosening the bolts holding the old motor to the pump backing plate. An impact wrench was required but after copious lubrication I got them off. I cleaned the bolts with a wire brush before reassembly. Then replaced the backing plate portion of the seal and bolted on the new motor.
Then reassembled the pump backing plate and motor with new O-rings and the impeller side of the new seal. Went back outside to complete the pump reassembly and connected the electrical. Primed the pump and turned electrical power back on and started it up! Success. No more noisy pump motor.
1 to 2 hrs
Screwdriver, Socket Set, Circuit tester to test to make sure no wires are hot
2 0
1. Ensure power is cut off to unit at both panels
2. Disconnect power lead to old motor
3. Remove bolts that connect back plate with motor still attached and pull from the pump housing
4. Once these bolts are removed you can lift the entire unit (motor and back plate) out and then disassemble motor (4 bolts I think) from motor to back plate.
5. Remove the diffuser which allows access to impeller and remove 1 stainless steel bolt in center
6. Now you can remove the impeller that will allow access to motor mechanical shaft seal 7) With back place off and impeller removed replace new seals and reverse order
2 to 4 hrs
Screwdriver, Nut Drivers, Pliers, Socket Set, Wrench Set, Adjustable Wrench
5 0
1 to 2 hrs
Screwdriver, Socket Set, Wrench Set, Adjustable Wrench
2 1
I removed the old pool motor, housing, and impeller. I matched the specifications of existing motor and ordered a new one from INYO pools. After receiving, I went to a local pool store to buy the shaft seal as I forgot to order. Once I had that, wired everything back up, attached back to my filter and flipped on the power. Worked perfectly.
1 to 2 hrs
Screwdriver, Socket Set, Wrench Set, Adjustable Wrench
3 1
ordered on line and got a how to video that was very helpful the job itself was not to bad but I did not watch the video right away and ended up messing the seal up on the first try, but after watching the video, figured out what I messed up and fixed it in no time
The Most Helpful Review
44 6
(5 out of 5 stars) Pool Filter Motor
Reviewed By: DreamBigGoGreen from Bowie, Maryland ()
Pros: Customer service, shipping time, price and product
Cons: None that I can think of
Best of all is the wonderful customer service help provided by Inyopools. The product was here in the time specified and the price was considerably less than the 5 other companies I checked with first. The product was as specified and ordered and hasn't given me any problems to date. It was installed about a month ago.
Was this review helpful to you?
The Most Recent Reviews
(5 out of 5 stars) Great customer service. Perfect part. easy to replace.
Reviewed By: Inyo Customer ()
Perfect replacement motor. the customer service rep helped me find the right part and very quickly as well. He was very knowledgeable and was super helpful in all my questions. he even knew the quirks of the web site and showed me how to make sure i find the right parts on my own if needed next time.
Was this review helpful to you?
(3 out of 5 stars)
Reviewed By: Inyo Customer ()
Lasted only 6 years. Original equipment (Jandy Stealth SHPM 1.5) installed Mar 2013, Purchased this one ($199) to replace original motor on Feb 2018, replaced again on Jan 2024 (same motor for $282). Texas weather. Running pump daily 8-10 hours. Winter 6 hours. 14,000 gallons pool. No spa just a single waterfall and cleaner once a week. Let see how long the replacement last. It’s not as quiet as the original equipment.
Was this review helpful to you?
(1 out of 5 stars)
Reviewed By: Inyo Customer ()
Bearings went out after 2 years.
Was this review helpful to you?
(5 out of 5 stars) Flawless Order Delivery
Reviewed By: Inyo Customer ()
Quickest and most aggravation free order for pool parts I've ever placed from a pool supply company. Received the parts in record time and will not consider ordering from another supplier going forward - great experience!
Was this review helpful to you?
(5 out of 5 stars) They picked the right replacement!
Reviewed By: Inyo Customer ()
Part came complete, works as intended! Don’t forget to replace your gaskets and seals while you’ve got your pump apart!
Was this review helpful to you?
(5 out of 5 stars)
Reviewed By: Inyo Customer ()
Customer was waiting for the new motor because she thought her pool was going to get green, motor took less time that I expected, I replace it on 45 minutes and she like how quiet the moto is, and another customer happy.
Was this review helpful to you?
(4 out of 5 stars) Doesn't last very long
Reviewed By: Inyo Customer ()
Doesn't last very long.
Was this review helpful to you?