$4,599.00
Part # W3HP21104T
Warranty 1-Year Parts-Only Warranty

This W3HP21104T was discontinued by Hayward. It has been replaced by model W3HP31005T.
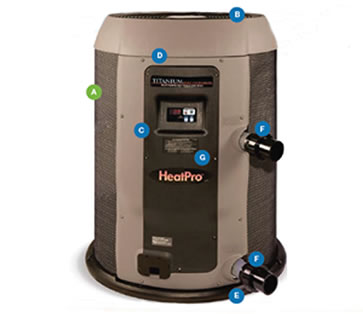
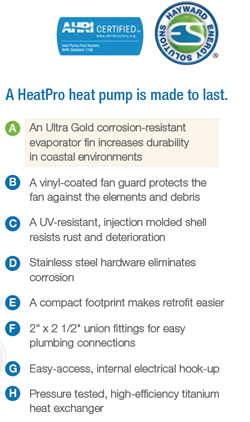
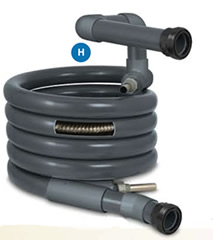
For the after-market and new construction the HeatPro is the only round, compactly designed heat pump that combines excellent energy efficiency, industry leading quiet operation, easy installation and for superior value, performance and reliability, a standard ultra gold fin evaporator coil for superior coastal corrosion resistance.
Warranty:


This heat pump is labeled for an in-ground pool. Can it also be used for an above ground pool?
Reply
Yes, this heat pump can be used with an above ground pool. You just have to ensure that it is wired correctly. It needs a 60 amp dedicated circuit breaker and has to be wired directly to the circuit breaker box.
Reply
Less than 1 hr
Screwdriver, Pliers
2 to 4 hrs
Screwdriver, Pliers, Adjustable Wrench, Hacksaw, wire stripper, dolly to move heat pump.
1. Went to Inyos Pool website, and found replacement Hayward Pro Heat Pump 110,000 BTU. Ordered, and delivered.
2. Watched YouTube video on how to hook up heat pump.
3. Took pictures of plumbing and electrical of existing heat pump, in place.
4. Disconnected (turned off) circuit breaker for heat pump. Opened GoldlinevController cover panel and disconnected heater control wiring from Goldline controller panel.
5. Disconnected PVC 2 1/2” inlet and outlet pipes by cutting (as close as possible to heat pump flanges).
6. Disconnected electric wires from circuit breaker box (opened up breaker box, took inside picture, disconnected and labeled each wire). Then had to disconnect wiring from the heat pump (but did not yet reconnect wire to circuit breaker box). Took picture before disconnect.
7. Disconnected Goldline Controller connecting wire from old heat pump.
8. Removed heat pump from concrete pad.
9. Moved new heat pump to concrete pad, about 3” to 4” closer to cut piping, to connect to cut pipes. New replacement heat pump was same model (newer version) so pipes lined up perfectly.
10. Inserted pipes into inlet and outlet flanges. This was a bit difficult, as I originally put in a bypass pipe and valve between inlet and outlet, so the inlet and outlet pipes were pretty rigid, but since they were aligned to flanges, was able to get them inserted. Used PVC glue on interior of flanges and circumference of pipes before inserting.
11. Connected heat pump wiring to bottom of heat pump electrical, using previous picture as guide.
12. Connected other end of electrical to opened circuit breaker.
13 Closed circuit breaker cover.
14. Connected control wiring to Goldline Controller, and to new heat pump.
15. Turned on circuit breaker.
16. New Hayward Heat Pump LED screen lit up.
17. Set temperature to 85F.
18. Heat pump began operating.
19. Hayward Controller settings for heat pump were not changed from prior (old heat pump) settings.
20. In hindsight, realized I only needed to disconnect electric and controller wires at the heat pump, not the circuit breaker and Goldline Controller.
Now I want to see if I can buy a replacement heat exchanger for the old heat pump, as the compressor motor and everything seemed to be working.
4 to 8 hrs
Screwdriver, Pliers
2 0
Installation - leveled the ground, laid some concrete pavers, set the heat pump, plumbed it and wired it. Everything was great except two noticeable things. One was that I installed the heat pump lower than the pool surface and the manual mentioned I might need to adjust the pressure switch, however, it appears they changed the design and it didn't match the picture in he manual. It turned out it wasn't an issue at all. The other was that I would have figured there to be a more secure wire connection. Usually when making an electrical connection there is a connector to hold the wire securely to the unit. In my case there wasn't one. Not an issue for me - there were two holes and the one they wanted me to use (as indicated by location and some type of fitting) was hindered by "stuff" below it so I used the other hole and added my own secure connector. Also, the lugs are not sized for wire size 6AWG, but that just happened to be the wire I had available and you can get by with wire size 8AWG so it isn't an issue. I posted 4-8 hours of time, but it depends on how much prep you need to do. The actual installation was ~2hours, but I had a few more hours into it to prep the location and pull wire from the house and fit the PVC piping so that adds to my time that may not be the case for somebody else.
1 to 2 hrs
Screwdriver, Nut Drivers, Pvc accessories and connectors
2 0
We purchased this heat pump after reading all the reviews on at least 8 others. This was the best one and inyo had the best price by almost$400. Ordering and shipping went flawless. After making a concrete brick platform for it, my buddy helped me install it. By far the best thin ng I did for my pool.
1 to 2 hrs
Socket Set
7 0
I bought this heat pump, Hayward Heat Pro Heat Pump 110,000 BTU, and saved a lot. It was delivered within a few days. The pump is working like a charm, my pool is now useable all year. In winter I set it to 85F and everyone in the family loves it.
The Most Helpful Review
17 1
(5 out of 5 stars) Great pool heater!
Reviewed By: Pat B. from Annville, PA ()
Pros: pleasant swimming condition, runs quietly and efficiently
Cons: price of purchase and installation
For years I have been tempted to buy a heater so I can enjoy my pool more by taking the chill off the water. I assumed it would be a very expensive proposition. Much to my delight, this heater works very well and my electric bills have shown much less of a bump then I expected. By covering the pool in the evening, it loses only a few degrees at night and quickly reheats just by sunlight. I have it set to go on if the water temp goes below 81 and it has not run once the entire month of July. I enjoy going into the pool in the evening, floating and chatting without feeling chilled by cool water. The grandkids love, love, love the warm water and swim for hours! We could not be more pleased with this product!
Was this review helpful to you?
The Most Recent Reviews
(5 out of 5 stars)
Reviewed By: Inyo Customer ()
?
Was this review helpful to you?
(1 out of 5 stars) Didn't even last two seasons!
Reviewed By: Inyo Customer ()
Didn't even last two seasons!
Was this review helpful to you?
(5 out of 5 stars) Nice heat pump
Reviewed By: Inyo Customer ()
This heat pump has been performing well. It is installed in my pool in Tucson AZ. Will easily heat the pool to 96 deg. From mid-spring to mid-fall. If you are good with PVC work this is an easy DIY project. I did upgrade my electrical service to the pool due to higher current demand. Don't forget about this before doing your project.
Was this review helpful to you?
(5 out of 5 stars)
Reviewed By: Inyo Customer ()
Fast shipping!! Great Product... Fit into existing area of removed heater.
Was this review helpful to you?
(5 out of 5 stars)
Reviewed By: Inyo Customer ()
Great experience dealiling with this company. Very knowledgeable staff. Beat prices around by far! I just ordered a salt system and I’m hoping the experience is the same. Thanks INYO!
Was this review helpful to you?
1 0
(5 out of 5 stars)
Reviewed By: Inyo Customer ()
I am so happy with the Hayward Heat Pro Pump! It works great and really heats up the water fast.
Was this review helpful to you?
1 0
(5 out of 5 stars) No issues - works great so far
Reviewed By: Inyo Customer ()
Just installed it a few days ago and so far so good. Easy to install. I happened to use 6AWG wiring and the lugs are too small for that, but most would likely use 8AWG I believe so not an issue. You may want to use a secure connector when entering the panel since there wasn't one. The PVC connection was very easy. My connections were not entirely square, but they didn't leak and the unions were only hand tightened so that's good. It said to push the POOL button, which I did, and set the temperature. In my case, I have a two-stage pump and the low stage doesn't provide enough flow so the low water pressure interlock prevented it from starting as indicated by the panel display flashing me a "PS" (for pressure switch - manual says it means low water pressure) . I turned my pump on high and it worked fine. My water temperature started at 69F and it was actually a bit cooler outside (manual says heater works best if in the sun, but that wasn't an option for me so it is shaded). I had calculated about 1.5 hours (at 100% efficiency) to heat my ~15,000 gallons one degree Fahrenheit, but it took more like 2-3 hours (I'm not complaining). That's a rough figure since I wasn't watching it closely. I'm not sure how much heat loss I have, but do have a 24' diam round aboveground pool.
Was this review helpful to you?